
Easy Homemade Creamed Corn Side Dish Recipe

Introduction
Creamed corn side dish recipe is one of those cozy classics that feels fancy but cooks like a shortcut. It’s creamy, buttery, just a little sweet, and deeply comforting. If you grew up on canned creamed corn, this homemade version will feel like a glow-up in a bowl.
After ten years of cooking, testing, and tweaking in my own kitchen, I’ve learned that the best recipes don’t need a long ingredient list. They need good technique and bold flavor. This creamed corn proves it. Simple pantry staples. Big payoff.
I’ve served this at weeknight dinners, potlucks, and holiday tables. It always disappears. Always.
Why You’ll Love This Recipe
It’s fast, foolproof, and seriously creamy without being heavy. You control the sweetness, the seasoning, and the texture. It uses everyday ingredients you probably already have. Kids love it, adults crave it, and it works for casual meals or celebrations. Basically, it’s your new go-to corn side.
Ingredients You’ll Need For Creamed Corn Side Dish Recipe
- 4 cups corn kernels (fresh, frozen, or canned—drained if canned)
- 2 tablespoons unsalted butter
- 1 tablespoon all-purpose flour
- 1 cup whole milk (or half-and-half for richer flavor)
- 1 tablespoon cream cheese (optional, for extra silkiness)
- 1 teaspoon sugar (adjust to taste)
- ¾ teaspoon salt
- ¼ teaspoon black pepper
- Pinch of smoked paprika (optional)
- 1 tablespoon chopped parsley (optional garnish)

Easy Homemade Creamed Corn
Equipment
- Medium saucepan
- Wooden spoon or silicone spatula
- Measuring cups and spoons
Ingredients
- 4 cups corn kernels (fresh, frozen, or canned—drained if canned)
- 2 tsp tablespoons unsalted butter
- 1 tsp tablespoon all-purpose flour
- 1 cup whole milk (or half-and-half for richer flavor)
- 1 tsp tablespoon cream cheese (optional)
- 1 tsp teaspoon sugar
- ¾ tsp teaspoon salt
- ¼ tsp teaspoon black pepper
- Pinch smoked paprika (optional)
- 1 tsp tablespoon chopped parsley (optional)
Instructions
- Melt butter in a medium saucepan over medium heat.
- Stir in flour and cook 30–45 seconds.
- Slowly whisk in milk until smooth.
- Cook 2–3 minutes until slightly thickened.
- Add corn, sugar, salt, pepper, and paprika.
- Simmer gently 5–7 minutes, stirring often.
- Stir in cream cheese if using.
- Taste, adjust seasoning, garnish with parsley, and serve hot.
Notes
Equipment Needed
- Medium saucepan
- Wooden spoon or silicone spatula
- Measuring cups and spoons
How Do You Make a Creamed Corn Side Dish Recipe? (Step-by-Step)
- Warm the pan.
Place a medium saucepan over medium heat. Add the butter and let it melt completely. - Make a quick roux.
Sprinkle in the flour. Stir constantly for about 30–45 seconds until lightly golden and bubbly. - Add the milk slowly.
Pour in the milk little by little while stirring. This keeps the sauce smooth and lump-free. - Let it thicken.
Cook for 2–3 minutes until the mixture coats the back of a spoon. You should see gentle bubbles, not a rolling boil. - Stir in the corn.
Add the corn, sugar, salt, pepper, and paprika. Stir well to combine. - Simmer gently.
Lower the heat and cook for 5–7 minutes. Stir occasionally so nothing sticks. - Make it extra creamy (optional).
Add the cream cheese and stir until entirely melted and silky. - Taste and tweak.
Add a pinch more salt or sugar if needed. Finish with parsley. Serve hot.
Common Mistakes to Avoid
- Rushing the roux.
Skipping this step makes the sauce thin and watery. Take 30 seconds. It matters. - Dumping all the milk at once.
That’s how lumps happen—slow and steady wins. - Cooking at too high a heat.
You’ll scorch the sauce. Medium is your friend. - Under-seasoning.
Corn needs salt. Don’t be shy. - Forgetting to stir.
Creamy sauces stick fast. Give it love. - Use only low-fat milk.
It works, but whole milk tastes better.
Serving Suggestions
This creamed corn shines next to roast chicken, grilled steak, or baked fish. It’s dreamy with mashed potatoes and green beans. For holidays, pair it with turkey or ham. Spoon it over cornbread for a simple comfort combo.
Storage & Reheating Instructions
Store leftovers in an airtight container in the fridge for up to 3 days. You can freeze it for up to 2 months, but the texture may change slightly. Reheat gently on the stovetop over low heat, stirring in a splash of milk until creamy again.
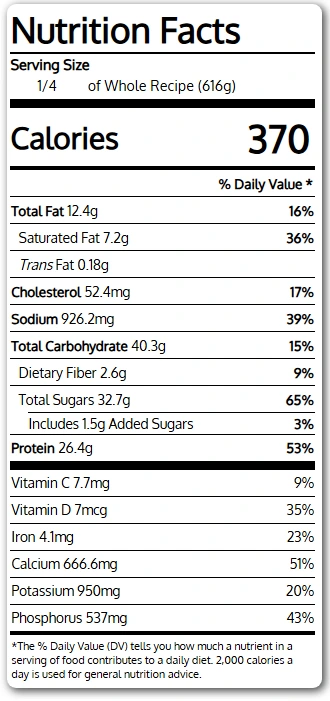
Nutrition Information For Homemade Creamed Corn Side Dish Recipe
Final Thoughts
This creamed corn is simple, creamy, and seriously delicious. It’s the kind of side that makes people ask for the recipe. Give it a try—you’ll wonder why you didn’t make it sooner.
Frequently Asked Questions
How do I make creamed corn thicker?
Cook it a little longer to let the sauce reduce, or add ½ teaspoon more flour to the butter before adding milk.
Can I use canned corn?
Yes. Drain it well, and it works beautifully. Fresh or frozen tastes brighter.
What is the best milk for creamed corn?
Whole milk gives the creamiest result. Half-and-half makes it extra luxurious.
How long does creamed corn last in the fridge?
About 3 days when stored correctly in an airtight container. Reheat gently.